A return to the War of 1812 using "Sharp Practice 2" by the Too Fat Lardies. A 'mint' set of Skirmish Rules for the Horse & Musket Era. We used our 28mm wargames figures for this one.
STARRING
The Bad Guys
 |
Colonel Davy SPROCKETT
leading the American Militia |
 |
Sergeant Richard VIXON
with the American Flank Company Skirmishers |
 |
Sergeant Jimmy FARTER
with the American 'Bravos' |
 |
Captain Joe PIEDEN
commanding the American Sailors |
 |
Captain Donald THUMP
and the American Woodsman Skirmishers
|
The Good Guys
 |
Major the Lord Horris JOHNSON
commanding the British Regulars of the XIX 'Green Howards' |
 |
Captain David COCKERMAN
and the British Light Company Skirmishers |
 |
Sergeant Tony FLAIR
leading the British Light Company Skirmishers
|
 |
Little BEAR
with the Indian Tribal Warriors |
 |
Big SNAKE
commanding the Indian Skirmishers |
THE BATTLEFIELD
 |
Bundy's Farm, with the collected stores for the advancing American Army.
Captain Joe PIEDEN with his merry men, have navigated the British lines & guards the stores. |
 |
| The American deployment point. Colonel Davy SPROCKETT rushes forward to secure the prize. American legend Captain Donald THUMP, will infiltrate through the woods with the Light Troops in support. |
 |
Loyalist Spies have gotten wind of the despicable plot. Major the Lord Horris JOHNSON leads forward elements of the XIX Infantry Regiment 'The Green Howards' with orders to Burn the Stores!
Allied Indian leader Little BEAR leads his men forward to ambush the Americans. |
THE STORY
turn 1
 |
Captain Joe PIEDEN starts on the table.
His men are brawlers, half armed with muskets & the other half with swords. |
 |
| The cards are kind, Colonel Davy SPROCKETT arrives. |
 |
| The American skirmishers run from the woods & take up a position to block the British advance. |
turn 2
 |
| American Legend Donald THUMP arrives... |
 |
Finally some British troops arrive. Lord Horris JOHNSON with the Redcoats.
However fearing to expose his flanks to the American Skirmishers he advances forward instead of taking the road to Bundy's farm. |
 |
| Foolishly a volley is unleashed & at this range does nothing... |
 |
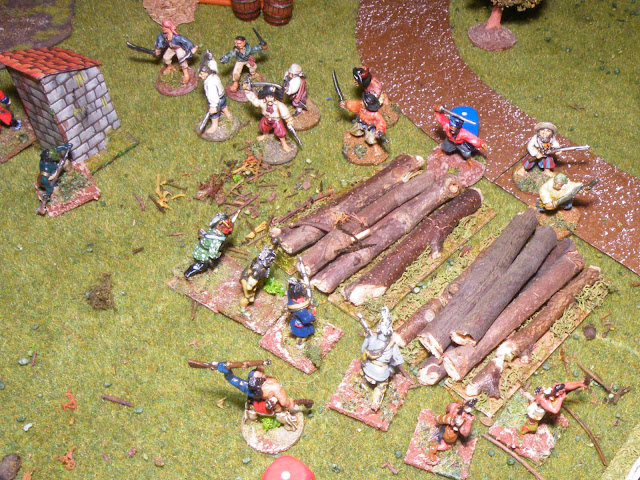
| Little BEAR's card is drawn, the trap is sprung. His troops rise up from behind the log piles & the outside Dunny. |
 |
CHARGE!!!!!
Tomahawks are drawn, inflicting a mighty amount of SHOCK on the Militia. The Indian Tribesman make short work of the Americans in a round of Fisticuffs. |
 |
| The battered Militia flee away from the fearsome Indians... |
 |
| The card of Colonel Davy SPROCKETT is drawn, he rallies his lads & unleashes a volley on the Indians. |
 |
| Captain David COCKERMAN arrives & starts sniping at the Americans. |
 |
| Who return the compliment... |
 |
| Big SNAKE's Skirmishers man the graveyard & unleash more SHOCK on the Militia. The Indian Ambush is working. |
 |
| On the other side of the field, the American Light Troops slow the British advance. |
turn three
 |
| Donald THUMP foolishly leads the Woodsmen further forward in a bid to flank the British Regulars.... |
 |
| The American Militia reply with another volley, but are hampered from the SHOCK they have received. |
 |
| Little BEAR falls back to the log pile. |
 |
"RIGHT LADS, FORWARD!"
Captain Joe PIEDEN leads his Sailors into the orchard. |
 |
| Donald THUMP pays the price from British shooting & retreats back to the bushes with his SHOCK hit lads. |
 |
| Jimmy FARTER looks on, he dithers with indecision. |
 |
Sergeant Tony FLAIR arrives with the remaining British Light Company.
The advance on Bundy's Farm can continue. |
turn four
 |
Jimmy FARTER is up next, however his charge comes up short.
More CARDIO needed lads, less beer & pies....
|
 |
| BIG SNAKE is drawn next, he leads a heroic rush for the supplies.... |
 |
Alas, poor Davy SPROCKETT, his lads are shattered by SHOCK.
All his unit can do is hide in the gulley & recover. |
 |
With the American Woodsmen nullified,
Lord Horris JOHNSON leads the advance towards the Farm. |
 |
So close now!!!
While Davy SPROCKETT hides in the woods. |
 |
Slurs are thrown, fingers raised in insults, pants dropped & moons shown...
The Indians & the Bravos face off. |
turn five
 |
Both units are drawn after each other.
Both take potshots at the other.... |
 |
| Nearly there Big SNAKE! |
 |
Little BEAR is drawn & charges the Bravos.
However these rough lads aren't afraid of the Indians with Big Choppers.... |
 |
"HAVE IT!"
The Indians lose the Fisticuffs & sent packing.... |
 |
Slow & Ponderous....
The Brits advance.... |
turn six
 |
OH OH!!!
Captain Joe PIEDEN charges in with his salty lads.... |
 |
| The Indians show a pair of clean ones & they evade.. |
 |
| Big SNAKE is drawn & shoots at Captain Joe PIEDEN's boys. |
 |
The cards are kind...
The Brits advance.
"LIGHT TROOPS ON THE FLANK, SERGEANT FLAIR" |
 |
| Sergeant Richard VIXON retreats to the farm. |
 |
| The Yanks are being held on this flank. |
turn seven
 |
| "Let's go hunting Donald THUMP!" |
 |
There may be trouble ahead...
The Don is down. |
 |
| It's only a knock out, but American Morale is dropping quickly... |
 |
| "FORWARD THE LADS!" |
 |
| Captain David COCKERMAN leads the Light Troops into the orchard. |
 |
| Jimmy FARTER leads the Bravos into the Indians.... |
 |
| Little BEAR pegs it off the table. |
turn eight
 |
| Jimmy FARTER's troops need a breather, their SHOCK level is high. |
 |
"AT 'EM LADS!"
Captain Joe PIEDEN attacks the Brits in the Orchard. |
 |
He's a lover not a fighter...
Captain David COCKERMAN chooses evasion. |
 |
Captain Donald THUMP is back!
He heads towards the farm. |
turn nine
 |
| The Brits advance in good order towards Bundy's Farm. |
 |
| Slowly Colonel Davy SPROCKETT brings round the Militia. |
 |
| It's not looking good for the Americans. |
 |
| Big SNAKE is not bothered about the Militia. |
turn ten
 |
| More hits from the British Light Troops force Captain Donald THUMP backwards.. |
 |
| A few hits on Brits fails to stop them. |
 |
DEATH OR GLORY CHARGE!!!
Captain Joe PIEDEN & his salty crew attack. |
 |
| He challenges the British commander to a duel.. |
 |
The results are poor for the Yanks.
Six kills for the Brits, Five for the Americans. |
 |
After an eternity rolling dice...
Captain Joe PIEDEN bites the dust. |
 |
BURN THE STORES!!!
British Victory. |
Superb, both SPAV & I love the Sharp Practice 2 rules. They really give a good game, which is back & forth. We used a card deck, for the random unit selection. some turns went on, some were quick. We also found that many times, the unit that had just been hit, then had it's activation adding to the fight. I wont try to explain the rule mechanics here, but if you are a fan of the Horse & Musket era, they are a MUST.
For our game shown, the dice behind the figures show the amount of SHOCK the unit has accrued. The yellow flame markers on a figure denote a CASUALTY for the unit (only needed for the big Group Units as we have 4 figure bases).
A massive thank you again to YouTUBE & all the people who put up videos on Battle Reports & how to play the game. I'll put links up in due time.
I had been pondering selling all our 28mm 1812 figures as I did not see a future for them. They were based DBx style, but with a few alterations, we now have a use for them. Of course, the Peninsular War, is on the cards! I'm building the French forces up now. Though for now, we can play a War of 1812 campaign!


2 comments:
What an absolute hoot. It must have been even more so in the game. Brilliant report. Looks marvellous too.
Regards, James
Cheers James
Yes it was a fun game, the Sharp Practice rules are great. I've had a copy for a couple of ears now, but never read them through. Watching You Tube Battle Reports perked my interest. In so doing it has also rescued our 28mm figures. Now I am hooked & painting 28mm figures galore. Much easier on the eyesight as well...lol
I can see us playing this for a long time now. Plus it has also got me thinking on other campaigns but using a 15mm figures for other different periods, which ae just gathering dust at the moment.
We will still use DBN for BIG set piece battles, but Sharp Practice will be our chosen Skirmish rules.
All the Best
MrF
Post a Comment